
![]()
SNO GUN-IITM CLEANER
DESCRIPTION AND OPERATING INSTRUCTIONS
INTRODUCTION
You have just purchased the very latest in dry ice snow cleaning systems, the SNO GUN-IITM manufactured by Va-Tran Systems, Inc. This innovative system employs the use of interchangeable Linear Flow nozzles, Metering Tubes, and Snow Flake generating tubes for selecting exactly the correct flowrate and aggressiveness for your cleaning application. There are at least 9 different flow and aggressiveness combinations that come standard with every SNO GUN-IITM dry ice snow cleaning system. These interchangeable nozzles can be removed and replaced without the use of tools, for your convenience. Va-Tran dry ice snow cleaning systems are presently in use by many companies in a variety of different applications. This system is engineered to provide an environmentally and economically sound substitute for the use of CFC based cleaners in many current applications.
These instructions represent our experience in the use of dry ice snow cleaning systems. You may want to try other things or call us if you have further questions regarding its use. We firmly believe that part of selling any new technology is helping the customer use it successfully. Dry ice snow cleaning is a growing field with many new applications and methodologies being developed daily.
SAFETY CONSIDERATIONS
The SNO GUN-IITM dry ice cleaner is of the latest design and as such it is important that everyone using this device understand the potential hazards. The snowflakes do look pretty and there is a tendency to 'play' with the system. Va-Tran Systems, Inc. cannot control the applications of the purchaser, and therefore cannot be held responsible for injuries, accidents, or losses resulting from the use or misuse of the dry ice cleaning system.
1) Carbon dioxide (CO2 CAS # 124-38-9) is an inert gas, and human beings have a very high tolerance of exposure. OSHA requirements effective March 1, 1990 specify a TWA of 10,000 ppm and a STEL of 30,000 ppm. In real English, this means that a person can be exposed to an average concentration of 10,000 ppm over an entire 8-hour workday. A person can also be exposed to a concentration of 30,000 ppm when exposure is averaged over 15 minutes.
2) The threshold for humans of CO2 is well below both of these limits. At moderate concentrations, a sharp odor or taste will be detected. If there is a concern regarding the accumulation of CO2 in the working environment, several high quality monitors are available. The SNO GUN-II TM should only be used in a well ventilated area where CO2 vapor will not build up above these levels. If the SNO GUN-II TM is to be used in a non-ventilated, confined area, all personnel in this area must be provided with respirators that have an external breathable air supply. A common industrial respirator or fume mask will not remove CO2 from the air, and is not sufficient for use with the SNO GUN-IITM.
3) The blast of dry ice snowflakes or flow of liquid Carbon Dioxide should never be aimed at any person. The dry ice snow is very cold (-109oF). Momentary contact with human skin is harmless but a buildup of the snow will cause frostbite. In many applications the dry ice snow can be swept across the surface very quickly. In most cases this will preclude any condensation of water vapor or build up of snow particles on the surface. We have never experienced any cracking or scratching of ceramic or glass parts from the dry ice snow. Even gold-coated telescope mirrors have been cleaned with dry ice snow quite successfully. There is, however, always the danger of cracking with a highly stressed glass or ceramic part. Users and observers must wear appropriate eye protection at all times to minimize the chance of injury.
4) Parts being cleaned should be firmly supported to make sure that they do not blow away while being cleaned. No one wants to get hit by a flying wafer or eyeglass lens. The usual vacuum chuck or even a simple clamp is usually sufficient in securing the parts being cleaned.
5) The high-pressure hose that connects the tank to the nozzle is designed to withstand the high pressures of liquid CO2 at ambient temperatures (approx. 850psi). However, there is always a danger that a user might shut off the tank valve and put down the SNO GUN-IITM while there is still liquid Carbon Dioxide in the line. If this happens and the hose is exposed to elevated temperatures, the pressure within the hose will rise rapidly. For this reason, a fragmenting rupture disk is incorporated at the tank and filter attachment block. This rupture disk assembly is carefully designed and precisely calibrated to protect the SNO GUN-IITM from damage and users from injury. Under no circumstances should the rupture disk be plugged, defeated, or replaced with an assembly not supplied by Va-Tran Systems, Inc. To do so will immediately VOID all warrantees, and can expose the user to great danger of injury or death. These assemblies are stocked and available for immediate delivery from Va-Tran Systems Inc. NEVER bypass a safety device.
THE PROPER PROCEDURE FOR SHUTTING OFF THE CO2 TANK VALVE IS TO ALWAYS ALLOW THE CONTENTS OF THE HOSE TO BE VENTED THROUGH THE SNO GUN-IITM NOZZLE BEFORE RELEASING THE TRIGGER ON THE SNO GUN-IITM.
6) The SNO GUN-IITM cleaner is designed to function only when supplied with liquid CO2. The use of any other type of compressed gas, liquefied gas or any liquid may cause damage to the SNO GUN-IITM and/or injury to the user. In any and all cases this will void the warranty.
DO NOT USE THIS CLEANING DEVICE WITH ANY OTHER COMPRESSED GAS, LIQUEFIED GAS, OR LIQUIDS.
ASSEMBLING THE SNO GUN-IITM CLEANING SYSTEM
All cylinders should be adequately restrained in an approved cylinder rack or securely fastened to a structural wall or bench clamp unit to avoid any possibility of the cylinder tipping over. Use only approved compressed gas cylinder restraining devices. A generous supply of stainless steel braided hose has been provided to eliminate the need to try to stretch the gun from the cylinder 'just a little further'. This hose is provided only to transport carbon dioxide to the gun, it should under no circumstances be used as a leash to push, pull, restrain, or tie down a cylinder.
The SNO GUN-IITM cleaning system starts with a Teflon gasket secured by a stainless steel nut that connects to your liquid carbon dioxide source. Make sure that the fittings match, that the Teflon gasket is in place inside the stainless steel nut, and that the nut is wrench tight before opening the CO2 liquid supply line. Please note that there is no regulator in the line. Regulators do not work with liquefied gasses, and this system has been designed to use the full pressure of liquid from the tank.
Connect the SNO GUN-IITM to a room temperature CO2 cylinder capable of delivering liquid CO2. A cylinder marked "Liquid Carbon Dioxide", "Siphon" or "Dip Tube" is the correct type. This cylinder will have an internal pressure of 800 to 1200 psi depending upon the ambient temperature. The Teflon seal will compress easily, and should not be overtightened. Typically 1/4 to 3/8 turn from handtight with a wrench is sufficient to seal the block to the tank. If a leak develops at the tank seal, turn off the tank and drain the line by holding the gun trigger open until all gas vents, then tighten nut another 1/8 to 1/4 turn with a wrench and re-try. A spare tank gasket is included with your unit should the original become distorted beyond use.
The quality of CO2 is of some concern but there is no simple answer regarding which grade is correct for you. A good way to start is to locate a room temperature cylinder of 99.99% pure CO2. This is usually available in cylinders holding 20 or 50 pounds. Pricing varies depending on where you are located but is typically less than $5.00 per pound. You may be able to find it for less than $2.00 per pound if you shop around. Do not use "Welding Grade" CO2 which contains far too much contamination for use in precision cleaning equipment.
There is no simple way to determine the level of contamination in a cylinder without cleaning a test surface. If your test results show a deposit of oil, contact your CO2 supplier and purchase a better grade of CO2 or contact Va-Tran Systems for information on Va-Tran Systems state-of-the-art CO2 purification equipment. We can provide you with 99.999999% pure CO2 from contaminated sources for as little as 5 cents per pound.
In addition to lowering the operating cost of the SNO GUN-IITM, a Va-Tran Systems Purifier provides more dry ice per pound of CO2 resulting in additional cleaning power and efficiency. Purification equipment is priced according to flow rate requirements but $5,000 is typical for a single cleaning station. Please contact Va-Tran Systems for additional information.
If you are using a Va-Tran Systems Purifier, it must be attached to a source of CO2 vapor and never to liquid from a siphon cylinder. Please fully read and understand the instructions provided with the Purifier before connecting the SNO GUN-IITM to a Purifier.
USING THE SNO GUN-IITM CLEANING SYSTEM
All wetted parts of the SNO GUN-IITM cleaner are of Stainless Steel or Teflon. The specially designed and manufactured interchangeable nozzle system is fitted for an acrylic extension tube that can be used if very large, soft dry ice flakes are desired. Without this extension, the SNO GUN-IITM will generate small, hard crystals of dry ice at various flowrates and aggressiveness, depending on the nozzle selected for your application. The system is supplied with Linear Flow Nozzles in 3 differing flowrates and aggressiveness, Metering Tube style nozzles in 3 differing flowrates and aggressiveness, and a Flaking Tube adapter for use with an acrylic snow tube for generating large soft snow flakes. Va-Trans Systems SNO GUN-IITM Linear Nozzles and Metering Tube Sets can be interchanged without the use of tools for your convenience.
Make sure the SNO GUN-IITM trigger is released and locked using the trigger lock integral with the handle, point the SNO GUN-IITM in a safe direction away from people, fully open the valve on the cylinder, then carefully listen for a gas leak, particularly at the filter block seal. With no leaks, remove the trigger lock and then slowly open the SNO GUN-IITM trigger. The SNO GUN-IITM is supplied from the factory with the Low Flow Linear nozzle attached. There will be an initial flow of gas through the system for purging the line. Once the system is purged, you will begin to get a mixture of CO2 vapor and dry ice flakes.
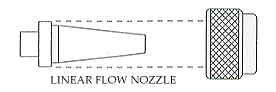
The Linear Flow Nozzles have the highest aggressiveness and are supplied with a Teflon Insulator to reduce water condensation on the nozzle tip during high use. Identifying our nozzles by flowrate and aggressiveness is easy. The outer diameter of the flange is stamped with an 'L' for 'Low Flow', 'M' for 'Medium Flow', and an 'H' for 'High Flow'.
The Metering Tube Nozzles have a medium level of aggressiveness and the flowrate is indicated by the color of the tube.
The Flaking Tube adapts onto the Metering Tubes and therefore there are 3 flowrates available for this also. For snow flakes, changing the rate of flow by using different metering tubes, and also by slipping some insulation on the outside of the acrylic tube will change the flake size. Generally, lengthening the tube will result in larger flakes. For determining the most effective and efficient cleaning methodologies, as is typical of most applications, some experimentation is required.
WATCH OUT FOR A BUILD UP OF DRY ICE PLUGS IN THE TUBE. THEY CAN BREAK LOOSE AND BLOW OUT AT A HIGH VELOCITY. BE CAREFUL WHERE THE SNO GUN-IITM IS POINTED TO AVOID INJURY.
NEVER AIM GUN AT PEOPLE.
When the acrylic tube is not used, the SNO GUN-IITM cleaner will generate very small, hard crystals that are useful in many cases. Determining the best configuration for your application is generally best done with some empirical experimentation.
If you find that you are just getting a cool gas and no snow or dry ice, this is the indication that your liquid CO2 source is exhausted. It is time for a fresh, full tank.
CLEANING SURFACES
Experiment with a clean, smooth, and dry glass or stainless steel surface. Contaminate the surface with dust particles, aim the SNO GUN-IITM cleaner at the test part, and pull the trigger. Aiming the SNO GUN-IITM with nozzle output almost parallel to the surface is most effective for dust. If you aim the nozzle perpendicular to the surface, it will remove light oil deposits, such as fingerprints and smudges. This process involves localized melting of dry ice particles as they impact the substrate. Liquid CO2 is an excellent solvent for organics.
If you have a problem with condensation build-up on your part, an infrared heat lamp or hot plate should be used to pre-warm the surface to be cleaned. Heating the substrate to about 20oC above ambient before and after cleaning will preclude any condensation as a result of the cleaning.
You can check for dust deposition and removal using a sharply focused bright light aimed at an angle to the surface. Dust particles 5 microns and larger will show up very nicely. Fluorescent dust is very easy to detect with an UV lamp of the type sold to mineral hunters by hobby shops.
A common mistake is thinking that the longer you clean the better you clean. If you can't get the dust off with a few 2-second bursts, the part may need to be pre-heated, a different nozzle may need to be selected, or the cleaner may not be best suited for that application. Va-Tran Systems provides free test cleaning and a 30-day trial purchase program to help determine if CO2 cleaning is best for you.
If you do get formation of ice crystals, which leads to a build-up of water condensation on the part, the part surface may become very hard to clean. The best solution is to warm up and dry off the surface with a small heat source (an industrial heat gun, hot plate, or infrared lamp) and try again.
If you are in a humid area, or otherwise wish to prevent condensation, you may want to flood the cleaning site with a dry gas. Usually CO2 gas is lower in cost than dry air or Nitrogen. In this case you need a CO2 tank without a siphon or dip tube. For applications like this where you want a dry gas, the usual CO2, Air, or Nitrogen regulator should be used.
OBSERVE ALL SAFETY PRECAUTIONS DISCUSSED ABOVE WHENEVER LARGE QUANTITIES OF NITROGEN OR CO2 GAS ARE VENTED INTO A CLOSED AREA. SUFFOCATION LEADING TO DEATH CAN OCCUR.
CHANGING NOZZLES AND TUBES
Your SG-II is shipped from the factory with the Low Flow Linear Nozzle assembled onto the gun. You may want to change nozzles to any of the 9 combinations that are possible with our standard nozzle selection. For special nozzle designs, consult Va-Tran Systems, Inc.
1) Removal. To remove any Nozzle or Tube Set from the SG-II, do the following:
* Close the tank valve or purifier outlet valve.
* Hold the trigger open until all gas/liquid carbon dioxide ceases to flow.
* Pull the trigger lock out from the handle to the fully locked position.
* Hold the gun such that the nozzle is pointed up, so loose parts do not fall out.
* Grasp the knurled nozzle nut and turn it in the counter-clockwise direction, and fully remove it from the gun. Refrain from using pliers or other tools that may mar or deform the polished surfaces.
* Hold the nozzle firmly, and pull straight out from the gun. A slight wiggle may be required to break the nozzle from the seat. Do not use tools to pry the nozzle out.
* The nozzle gasket should remain in the bottom of the nozzle cavity, which is bored into the front of the Nozzle Seat. Do not drop the gun with the nozzle nut removed, as the exposed threads are extremely fragile, and replacement of the valve body is expensive, requires special tools, and must be performed at the factory.
* The nozzle gasket can be re-used many times, but must be replaced when it will no longer make a seal.
2) Installation of Linear Flow Nozzles. Installation is essentially the reverse of removal, as follows:
* Ensure gas supply valve is closed at tank or purifier. Ensure trigger lock is on.
* Inspect the nozzle gasket. Replace it if the former nozzle leaked, it is visually torn, or if it is deformed to the extent that it occludes the flow hole through it. It is normal to see ridges, lines, or numbers pressed into the surface of the gasket. The gasket is made of Virgin Teflon, which cold flows, or compresses, very easily. This material has been chosen for its cleanliness and chemical inertness, along with its compressibility, which allows its use as a seal.
* Insert a Linear Flow Nozzle into the seat. It should easily drop in until it bottoms on the nozzle gasket.
* Slide the knurled nozzle nut over the nozzle, as shown, and tighten 'hand snug'. Now grip the SNO GUN-IITM firmly, and give a hard twist clockwise on the knurl to tighten the nut 1/16 to 1/8 turn past hand tight. Actually, very little force is required to 'squash' the Teflon nozzle gasket and make a leaktight seal. Refrain from using pliers or other tools that may mar or deform the polished surfaces. Also, use of using pliers or other tools may overtighten the gasket. Do not over-tighten. Never try to tighten the knurled nut with the tank valve open, while the gun is pressurized, or while CO2 is escaping. Over-tightening will result in premature failure of the nozzle gasket. If the nozzle will not stop leaking, refer to paragraph 3) of this section and replace the nozzle gasket.
* Open the valve at the tank or purifier. Carefully listen for a hiss or crackle, which will indicate a leak somewhere in the system.
* Push the trigger lock back up into the gun handle. Aim gun away from people, and open the trigger. It may take a few seconds to purge the 10' braided hose of cool gas before liquid CO2 exits the nozzle. Run the SNO GUN-IITM for 10 seconds after liquid appears, then look and listen for leaks around the nozzle and seat area.
* If the nozzle is leak free, the gun is ready for use. If leaks are present, close the tank or purifier valve, drain any liquid in the hose, snug the nozzle nut another 1/8 turn and try again. If the leak cannot be sealed in this manner, replacement of the nozzle gasket may be indicated.
* Replacement part numbers are listed on the storage tubes themselves, and in a list at the end of this document.
3) Replacing the Nozzle Gasket:
* Ensure the tank or purifier valve is closed.
* Ensure the hose has been purged of all liquid and gas.
* Fully remove the nozzle nut and nozzle.
* Pull the trigger wide open and keep open.
* Use the screwdriver/nozzle gasket tool from the SNO GUN-IITM case, and screw the gasket removal end (looks like a #8 sheet metal screw), one turn into the center opening of the gasket. Pull gasket straight out. Do not use a 'hook', bent paper clip or dental-pick type device to remove the gasket. There is a Teflon seal in the BACK of the seat that could be irreparably damaged as a result.
* Locate a new nozzle gasket in the expendables tube in your SNO GUN-IITM case, and insert into the nozzle seat cavity. Use the nozzle to carefully push it flush to the bottom.
* Your SNO GUN-IITM is ready for the nozzle of choice.
* Replacement part numbers are listed on the storage tubes themselves, and in a list at the end of this document.
4) Installing Metering Tube Sets:
* Locate the metering tube of choice. The aggressiveness increases progressively as these colors are listed, with Beige (low); Orange (medium); and Green (high).
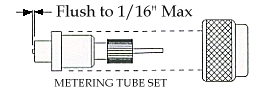
* Note orientation of the sealing ferrule, as shown. The flat end should go into the stainless adapter, and the tapered end should go into the black plastic 'flangeless nut'. Slide the tube into the stainless adapter until the tube is flush at the back. It may protrude up to 1/16 of an inch.

* Slide the flangeless nut over the protruding tube and screw into the adapter, as shown. Tighten firmly by hand. Do not overtighten.
DO NOT USE PLIERS OR OTHER TOOLS ON THIS PART.
* Slide the metering tube set into the cavity of the nozzle seat. It should easily drop in until it bottoms on the nozzle gasket.
* Slide the knurled nozzle nut over the metering tube set, as shown, and tighten 'hand snug'. Now grip the SNO GUN-IITM firmly, and give a hard twist clockwise on the knurl to tighten the nut 1/16 to 1/8 turn past hand tight. Actually, very little force is required to 'squash' the Teflon nozzle gasket and make a leaktight seal. Refrain from using pliers or other tools that may mar or deform the polished surfaces. Also, use of using pliers or other tools may overtighten the gasket. Do not over-tighten. Never try to tighten the knurled nut with the tank valve open, while the gun is pressurized, or while CO2 is escaping. Over-tightening will result in premature failure of the nozzle gasket. If the nozzle will not stop leaking, refer to paragraph 3) of this section and replace the nozzle gasket.
* Open the valve at the tank or purifier. Carefully listen for a hiss or crackle, which will indicate a leak somewhere in the system.
* Push the trigger lock back up into the gun handle. Aim gun away from people, and open the trigger. It may take a few seconds to purge the 10' braided hose of cool gas before liquid CO2 exits the nozzle. Run the SNO GUN-IITM for 10 seconds after liquid appears, then look and listen for leaks around the nozzle and seat area.
* If the metering tube set is leak free, the gun is ready for use. If leaks are present, close the tank or purifier valve, drain any liquid in the hose, snug the nozzle nut another 1/8 turn and try again. If the leak cannot be sealed in this manner, replacement of the nozzle seal may be indicated.
* Replacement part numbers are listed on the storage tubes themselves, and in a list at the end of this document.
5) Installing the Flaking Tube. Use the flaking tube to generate large soft dry ice crystals, for the gentlest cleaning possible.
* Install a metering tube set per #4, above.
* Locate the Flaking Tube Adapter from its storage tube in the SNO GUN-IITM case.
* Slide the adapter over the front of the metering tube set, as shown, all the way to the nozzle nut.
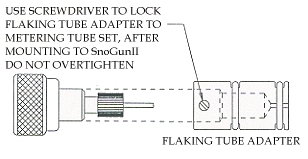
* Using the small, flat-blade screwdriver included in the SNO GUN-IITM case, tighten the single white nylon set screw that protrudes from the adapter. Minimal force is required to hold the adapter on. Do Not Overtighten. Failure of the set screw could result. (A spare set screw is included in the expendables tube for your convenience).
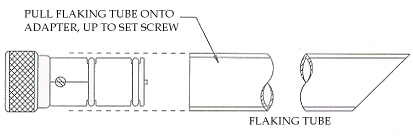
* Locate the Flaking Tube under the instruction booklet in the cover of the SNO GUN-IITM case. Grasp it firmly and pull the square end of the tube over the o-rings of the adapter until it reaches the set screw, as shown. The tube will stay on the adapter without use of fasteners.
* Open the tank or purifier valve, take off the trigger lock, pull the trigger, purge the 10' hose, and use the SNO GUN-IITM . You are now ready to generate beautiful dry ice snowflakes, which are a very gentle and effective solvent for Precision Cleaning.
* Replacement part numbers are listed on the storage tubes themselves, and in a list at the end of this document.
CHANGING THE PARTICULATE FILTER
You may have noticed a spare particulate filter element in the SNO GUN-IITM case. Your SNO GUN-IITM is protected by a .5 micron, 316 Stainless Steel sintered filter located at the inlet to the gun valve body. This assures that only clean CO2 enters your cleaning equipment. Also, the internals of the SNO GUN-IITM have been smoothed and polished so that you can be assured of clean, particle free CO2 snow flakes and dry ice crystals for your precision cleaning needs. This element should be replaced every 6 months or sooner, depending on the cleanliness of the CO2 gas used and the amount of use (duty cycle) the SNO GUN-IITM is seeing. High use guns should have the filter replaced quarterly or sooner.
6) To change the filter, follow this procedure:
* Close the valve from the tank or purifier.
* Hold the SNO GUN-IITM trigger open until all gases cease to flow.
* Remove the block and hose from the tank or purifier, being careful not to lose the Teflon tank gasket. (A spare tank seal is included in the expendables tube for your convenience).
* Lay the gun flat on a clean work surface.
* Remove the 10' hose from the gun by holding the 11/16" hex o-ring fitting with an open end wrench or adjustable wrench, and loosen & remove the 9/16" hex tube fitting nut from the o-ring fitting. Set the 10' hose aside, being careful to keep dirt and debris from entering the open end.
* Now hold the gun firmly, and remove the o-ring fitting and its 1" long stainless steel compression spring from the SNO GUN-IITM inlet.
* Inside you will find a 1/2-inch diameter x 11/16" long sintered filter element, and beneath it a Teflon filter seal. Remove both from the valve body inlet.
* Remove the spare element from its storage tube in the SNO GUN-IITM case. Discard the old filter element and replace with the new element and seal, in reverse order of disassembly. The seal should 'snap' into the bottom of the filter element for ease of assembly into the gun valve body. Be sure the filter seal and filter go all the way in to the bottom of the filter seat.
* Be certain the filter is fully engaged in the seat, then replace the o-ring fitting with the stainless steel compression spring placed into its outlet. Use an 11/16" wrench or deep well socket and tighten the fitting to 15-18 ft-lbs. of torque. The o-ring makes a good seal with much less force than this, but the additional tightness keeps the fitting from loosening as you use the gun. Make sure the fitting is at least this tight.
* Push the hose end with ferrules back into the o-ring fitting. Re-tighten the nut fully hand tight, then turn from 1/8 to 1/4 turn tighter, and no more. This is sufficient tightness for re-make of a Swagelok fitting. Do not overtighten, and do not try to tighten against a leak.
* Reattach the block to the tank, using a new tank seal from the expendables tube if necessary. The same holds true for this Teflon gasket as for the nozzle gasket; do not overtighten it.
* Open the tank valve, purge the gun, check for leaks, and you are now ready for 6 more months of trouble-free SNO GUN-IITM operation.
* Replacement part numbers are listed on the storage tubes themselves, and in a list at the end of this document.
IN CASE OF TROUBLE
Feel free to call upon Va-Tran Systems if you have problems. Part of the advantage you gain by purchasing this cleaning system from Va-Tran Systems Inc. includes Factory Technical Assistance. Va-Tran Systems has a fully trained and experienced support staff that can help with your unanswered questions. Also, Va-Tran Systems has the experience and capabilities to design customized components and specialized systems, and, we can fabricate nearly anything that you may need for the proper application of this equipment.
LIST OF SPARE AND EXPENDABLE PARTS
Replacement part numbers are listed on the storage tubes themselves, and in the list show below. Please call 1-800-DRY ICE 1 (1-800-379-4231) to order spare and replacement parts.
Part Number Description
SG2-NL-55 Low Flow Nozzle Assembly
SG2-NL-59 Medium Flow Nozzle Assembly
SG2-NN-63 High Flow Nozzle Assembly
SG2-NMTS Metering Tube Set- 3 tubes & ferrules, adapters
SG2-NFNA Flaking Tube Nozzle Adapter
800-6800 Flaking Tube, 3/4", Polished
820-0610 Particulate Filter Element
041-080132SS Compression Spring, Filter Retention
820-0510 Nozzle Gaskets, pack of 25
820-0240 Knurled Nozzle Nut
![]()
Home
![]()

677 ANITA STREET, SUITE A, CHULA VISTA,
CALIFORNIA 91911
phone: 619/423-4555 toll free 800/379-4231 fax: 619/423-4604
Copyright 1998, Va-Tran Systems
Incorporated.